
Ghost decorations are one of the easiest and most rewarding Halloween projects you can tackle with your kids, whether you’re whipping up spooky treats in the kitchen or spreading glue and glitter across the dining room table. From tissue paper phantoms that take five minutes to cheesecloth specters that look genuinely eerie hanging from your porch, these projects work for toddlers through tweens and cost next to nothing.
I still remember the year my daughter was three and we made our first batch of ghost lollipops together. She got more marshmallow fluff in her hair than on the actual pops, but watching her face light up when she drew wobbly eyes on each one reminded me why kid-friendly DIY Halloween projects matter more than store-bought perfection.
The beauty of ghost decorations is their flexibility. Running short on time? Grab some white balloons and a marker. Want something more involved for an afternoon when the weather keeps everyone inside? Try papier-mâché ghosts that can become a multi-day project. Have food allergies to work around? There’s a craft version. Prefer edible fun? The kitchen options are endless.
What follows are 15 ghost decoration ideas split between things you can eat and things you can hang, each chosen because real moms have tested them with real kids in real living rooms. Some will become your October traditions. Others might be one-time experiments. All of them prioritize the giggles and togetherness that make this season special.
How We Chose These Ghost Decoration Ideas
When I sat down to curate these ghost decoration ideas, I channeled every conversation I’ve had with fellow moms about what actually works when crafting with kids. We’ve all been there, Pinterest-perfect projects that end in tears, glitter explosions, or ingredients we’d need to drive across town to find. These selections passed a different test.
I prioritized projects that deliver on the promise of fun without setting anyone up for frustration. Each idea here meets specific criteria that matter when you’re juggling bedtimes, grocery budgets, and the reality that your five-year-old’s attention span maxes out around twenty minutes. I wanted options that feel achievable on a Tuesday evening, not just during a mythical weekend when everything goes perfectly.
Here’s what I considered for every project on this list:
- Age-appropriate difficulty levels, from toddler-friendly to tween-ready
- Materials you likely have at home or can grab during regular grocery shopping
- Realistic time commitments, clearly noted so you can plan accordingly
- Honest mess assessments, because some days you can handle flour everywhere and some days you cannot
- Safety factors like heat requirements, sharp tools, or choking hazards
- Whether the project is edible or decorative, giving you flexibility for different needs
I also included a mix that spans skill levels and interests. Some kids light up at the chance to decorate cookies, while others would rather paint and glue. You’ll find both cooking and traditional craft options here, so there’s something that clicks with your particular crew. Unlike thrift store Halloween finds that you display as-is, these projects put your family’s creativity front and center while building traditions you’ll remember long after the decorations come down.
Edible Ghost Decorations: Cooking Projects
Ghost Meringue Cookies
These light, airy cookies are a wonderful first baking project because meringue is surprisingly forgiving. You’ll whip egg whites with sugar until they form stiff peaks, then pipe them into ghost shapes on a parchment-lined baking sheet. The secret is low-and-slow baking, about 200°F for an hour, which dries them out rather than browning them.
Kids love adding the chocolate chip eyes while the meringue is still wet, pressing them gently so they stick. The cookies come out crisp and sweet, almost marshmallow-like inside. They’re also naturally gluten-free, which works well if you’re hosting friends with dietary restrictions. One mom in our community mentioned her five-year-old daughter calls them “crunchy clouds,” which pretty much sums up their appeal.
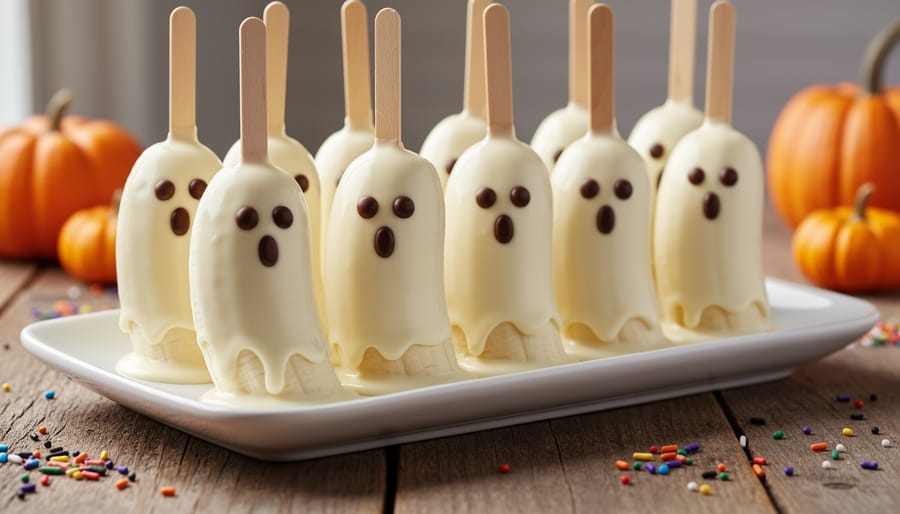
Boo-nana Ghost Pops
These frozen treats are pure genius for hot fall afternoons when you’re prepping decorations. Cut bananas in half, insert popsicle sticks, then freeze them for at least two hours. Once solid, dip each banana in melted white chocolate (the microwave method works perfectly) and let the excess drip off. Before the chocolate sets, add mini chocolate chip eyes and a little mouth. Pop them back in the freezer until serving time.
Kids love that these are both a snack and a decoration, at least until someone gets hungry. The best part? Even toddlers can help with the chocolate chip placement, and the mess stays minimal since you’re working with frozen fruit. They’ll keep in the freezer for up to a week if you store them in an airtight container.
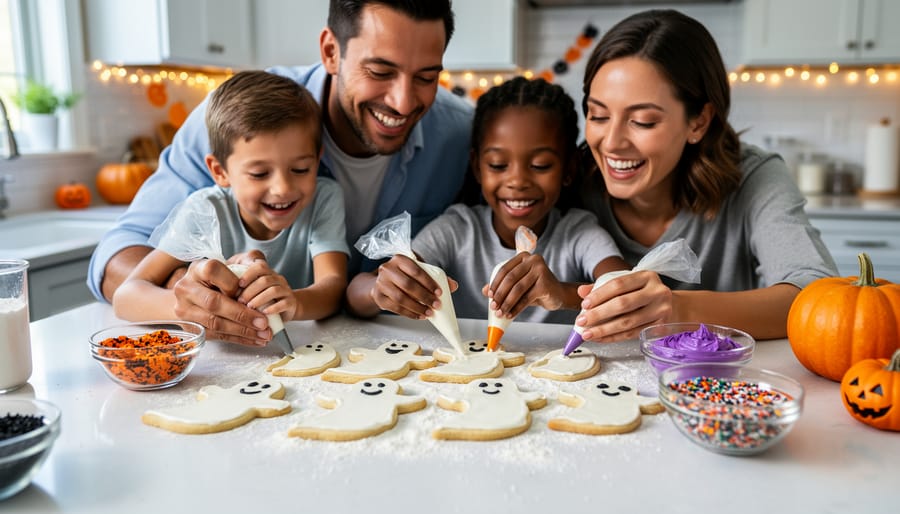
Ghost Sugar Cookies
Ghost sugar cookies are a Halloween staple that kids genuinely get excited about, there’s something magical about turning plain dough into edible ghosts. You’ll need your favorite sugar cookie recipe (or a store-bought roll if you’re pressed for time), a simple ghost-shaped cookie cutter, and white royal icing or buttercream. The decorating part is where the real fun happens: give each child edible markers or tiny tubes of black icing to draw faces, and you’ll see personalities emerge on every cookie. Some ghosts will look surprised, others silly, a few downright wonky, and that’s exactly the point. These cookies work beautifully as party treats, classroom contributions, or sitting pretty on your kitchen counter as both decoration and afternoon snack.
Ghostly Cake Pops
Cake pops turn into adorable ghost decorations when you dip them in white candy melts and add simple faces. The beauty of this project is that you can use store-bought cake mix and frosting to save time, or work with leftover cake from another baking session. Once you’ve formed the basic cake balls and inserted lollipop sticks, the real fun begins, dipping them in melted white chocolate creates that smooth ghost exterior.
Kids love decorating the faces with mini chocolate chips for eyes or using black food-safe markers to draw different expressions. Some ghosts can look surprised, others silly, and a few downright mischievous. The trick is working quickly while the coating is still slightly wet so decorations stick properly. These cake pops look impressive displayed in a styrofoam block or clear jar, making them perfect for class parties or as edible centerpieces.
Ghost Rice Krispie Treats
Rice Krispie treats are a mom’s secret weapon because they’re nearly impossible to mess up, and kids think they’re magic. For ghost versions, make your standard batch (butter, marshmallows, cereal, you know the drill), then press the warm mixture into a 9×13 pan. Once cooled, use a ghost-shaped cookie cutter or simply cut rectangles and round the tops with kitchen scissors. The best part? Decorating. Hand each kid a tube of black decorating gel and let them draw faces. Some ghosts will look surprised, others goofy, that’s the charm. These stay fresh for days in an airtight container, perfect for making ahead before the Halloween rush hits.
Floating Ghost Donuts
Donuts get a spooky makeover with this project that’s as fun to decorate as it is to eat. Start with store-bought donuts, plain cake donuts work best, and dip them in white frosting or melted white chocolate. While the coating is still wet, your kids can add chocolate chip eyes and draw wavy mouths with black icing gel. The beauty here is that there’s no wrong way to do it; wobbly eyes and crooked smiles just make these ghosts more charming. Display them standing upright on a platter or hanging from strings for a floating effect. They’re perfect for class parties since they’re individually portioned, and unlike elaborate baked goods, you can whip up a dozen in twenty minutes. Just be prepared for more eating than decorating once the kids get started.
Ghost Marshmallow Pops
Ghost marshmallows on sticks are probably the fastest edible decoration you’ll make all season, and kids as young as three can help. Push a lollipop stick or wooden skewer into a jumbo marshmallow, then hand your child an edible marker to draw simple ghost faces. If markers aren’t cooperating (they sometimes smudge on the marshmallow’s powdery surface), try piping tiny dots of black icing for eyes and mouths instead. These pops stand upright in a foam block or vase filled with candy corn, turning your kitchen counter into an instant ghost gathering. My daughter made twenty in under fifteen minutes last year, and half were gone before dinner. They’re sweet, simple, and require zero baking skills.
Spooky Ghost Cupcakes
These cupcakes bring a touch of elegance to your Halloween spread while still being approachable for home bakers. Start with your favorite vanilla cupcake recipe or a quality boxed mix, nobody’s judging, and the kids won’t know the difference. The magic happens in the decorating.
For fondant ghosts, roll white fondant thin, cut ghost shapes with a cookie cutter, and drape them gently over the frosted cupcakes before adding chocolate chip eyes and mouths. If fondant feels intimidating, pipe buttercream ghosts instead using a round tip to create the body and a smaller tip for facial features. Older kids can practice their piping skills while younger ones handle the chocolate chip placement. These cupcakes look bakery-worthy but come together surprisingly quickly, making them perfect for classroom parties or trick-or-treat gatherings.
Craft Ghost Decorations: Non-Edible Projects
Tissue Paper Hanging Ghosts
These floating tissue paper ghosts remain a Halloween staple for good reason, they’re virtually foolproof, even with toddlers helping. You’ll need white tissue paper, string or fishing line, cotton balls or newspaper for the head, and a black marker. Bunch a cotton ball in the center of a tissue square, gather the paper around it to form the head, and tie with string. Kids draw ghost faces on the “head” with markers, then you hang them from doorways, light fixtures, or trees. The gentle movement when air passes creates that floating effect children adore. Best part? Zero mess, and the whole project takes fifteen minutes. These ghosts work beautifully in multiples, a whole family of them dancing from your porch ceiling makes quite the welcoming committee.
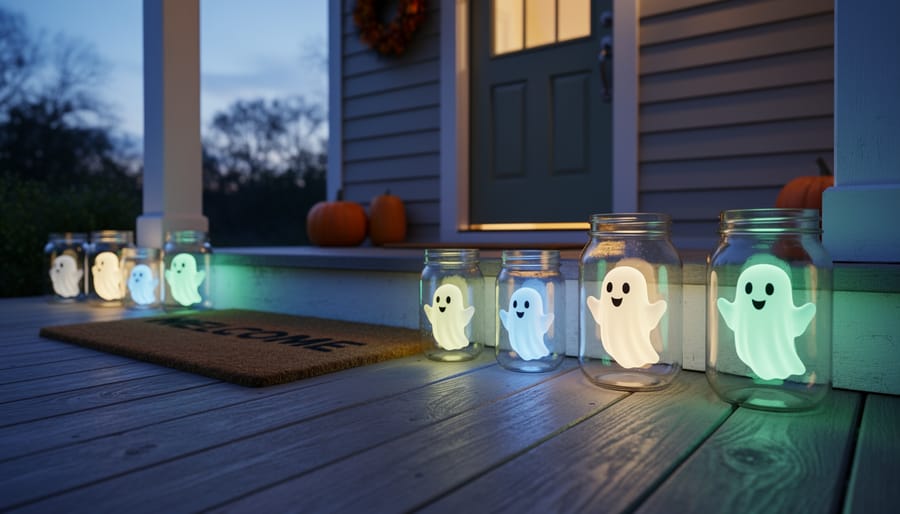
Mason Jar Ghost Luminaries
Mason jar ghost luminaries are one of my favorite projects because they’re simple, beautiful, and give you that warm Halloween glow on chilly evenings. All you need are clean mason jars (any size works, we’ve used everything from small jelly jars to quart-sized), white acrylic paint, black permanent markers or paint pens, and battery-operated tea lights for safety.
The process is wonderfully forgiving: kids paint the outside of the jars white, let them dry completely, then add ghost faces with markers. Younger children love drawing silly expressions while older ones might create spooky scenes. Once the paint is fully set, pop a tea light inside and watch your ghosts come alive at dusk. These work beautifully on mantels, windowsills, or as part of your family-friendly outdoor decor on covered porches. The best part is they’re reusable year after year if you store them carefully.
Paper Plate Ghost Garland
Paper plates are a crafting staple in most homes, making this project wonderfully accessible when inspiration strikes. Your kids can transform plain white plates into cheerful ghost faces with markers, paint, or crayons, let them experiment with different expressions from silly to slightly spooky. Once the faces dry, punch holes at the top of each plate and thread ribbon or twine through to create your garland. This decoration works beautifully draped across doorways, mantels, or along stair railings. Younger children can handle the entire process with minimal help, and the lightweight nature means you won’t worry about anything falling or breaking. One mom in our community strings hers vertically down her front porch columns, creating a ghostly welcoming committee that her neighbors love. The best part? These store flat for next year.
Cheesecloth Floating Ghosts
These ethereal ghosts look genuinely spooky hanging from tree branches or porch ceilings, and they’re surprisingly forgiving to make. You’ll need cheesecloth, fabric stiffener (or a homemade mixture of white glue and water), balloons or plastic bottles as forms, and black felt for faces. Drape the stiffener-soaked cheesecloth over your inflated balloon, arrange the “skirt” how you want it, then let it dry completely overnight. Once hardened, pop the balloon and remove it. The ghost holds its shape beautifully and sways in the breeze like it’s actually floating. Older kids can help with the draping and positioning, while younger ones enjoy decorating the faces. These make impressive outdoor decorations that neighbors always ask about.
Handprint Ghost Wall Art
Turn your child’s handprints into adorable ghost artwork that captures this moment in time while creating Halloween décor. Paint your child’s hand white (washable paint works perfectly) and press it onto black construction paper or a small canvas. Once dry, add googly eyes and a sweet mouth with markers or glue. You can create a whole family of ghosts using different hand sizes, or make a ghost “forest” across a larger canvas.
This project works beautifully for toddlers through elementary age, and the mess is minimal since you’re only painting hands. Frame the finished piece to display year after year, it becomes a treasured keepsake showing how small those hands once were. Many moms create one annually to track growth, building a collection of ghost memories.
Milk Jug Ghost Family
Turn empty gallon milk jugs into charming outdoor ghosts that greet trick-or-treaters! Simply clean and dry the jugs, then paint them white (acrylic craft paint works perfectly). Once dry, use a black permanent marker to draw simple ghost faces, let your kids get creative with silly, spooky, or friendly expressions. The magic happens when you place a battery-operated tea light or small string of lights inside each jug, creating an ethereal glow perfect for your porch-ready Halloween display. These weatherproof decorations hold up surprisingly well in rain and wind, making them ideal for the unpredictable October weather. Kids love creating an entire “ghost family” with different personalities, and the recycling aspect teaches environmental responsibility. Arrange them on porch steps, along walkways, or tucked into landscaping for a whimsical nighttime effect that’s both impressive and budget-friendly.
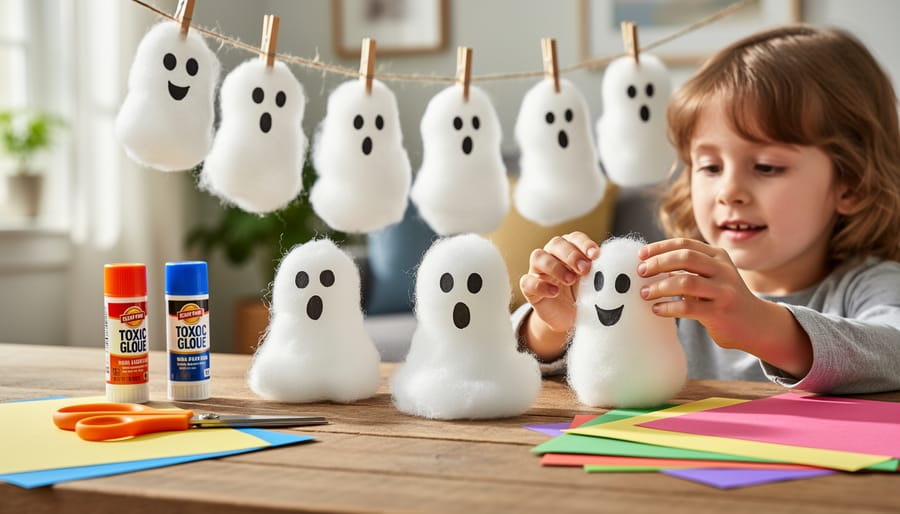
Cotton Ball Ghost Ornaments
These cuddly little ghosts are perfect for toddlers and preschoolers who love the sensory experience of gluing. Cut simple ghost shapes from white or light blue cardstock, then let your kids cover them completely with cotton balls using washable glue sticks. Once dry, they can draw faces with markers or add googly eyes. The fluffy texture makes these ghosts irresistibly touchable, and they’re sturdy enough to hang on doorknobs, attach to refrigerators with magnets, or string together as a garland. My daughter made a whole ghost family last year, naming each one and insisting they had different personalities based on their expressions. The mess level is minimal, and you probably have everything you need already in your craft drawer.
Tips for Crafting and Cooking with Kids
The best projects happen when you’ve set yourself up for success before the glue gun even gets plugged in. I’ve learned the hard way that fifteen minutes of prep saves an hour of chaos later, especially when you’re working with multiple kids or mixing food and art supplies. Start by gathering all your materials in one place so you’re not hunting for scissors mid-project while someone’s about to knock over the paint water.
Age matters more than you might think when delegating tasks. Toddlers can stick cotton balls onto pre-drawn ghost shapes or press chocolate chips into cookie dough, while older kids can handle scissors, paint brushes, and even basic cookie decorating. If you’ve got a range of ages, assign the detail work to your older children and give the younger ones the satisfying jobs like shaking sprinkles or crumpling tissue paper. Everyone stays engaged when they feel genuinely helpful.
Safety deserves a quick mention without being preachy about it. When you’re working with edible projects, keep raw egg safety in mind with meringues and check that any decorative elements going on food are actually food-safe. For crafts involving candles or tea lights in those mason jar luminaries, battery-operated LED versions give you the glow without the worry. I always keep the hot glue gun and any sharp tools in my zone, passing finished pieces to little hands rather than letting them near the heat.
The mess is temporary, but shutting down creativity to avoid it creates a different kind of mess entirely. Choose your battles, maybe the kitchen table gets covered in powdered sugar today, and that’s fine because you’re building traditions, not museum pieces. These safe family crafts work best when you let go of perfection and focus on the laughter happening around you.
items
Here’s a quick snapshot of all 15 Halloween ghost decoration ideas to help you decide which projects fit your family best. The edible options range from simple no-bake treats like Boo-nana Ghost Pops to slightly more involved baking projects like Ghost Sugar Cookies. Each one turns into a decoration you can display before eating, making them perfect for parties or festive afternoons.
The craft projects span different skill levels too. Tissue Paper Hanging Ghosts work beautifully for toddlers and preschoolers, while Cheesecloth Floating Ghosts might need more grown-up hands. Some, like Mason Jar Ghost Luminaries, become decorations you’ll reuse year after year.
You don’t need to tackle all 15. Pick two or three that match your kids’ ages and your available time. Mix an edible project with a craft, or focus entirely on one category. The goal is enjoying the process together, not checking every box. These ideas are meant to inspire, not overwhelm. Choose what sounds fun for your crew, gather your supplies, and let the ghost-making begin.
Quick Recap: Your Ghost Decoration Options
You’ve now got 15 ghost decoration ideas to choose from, split between edible treats and craft projects. Whether you have 20 minutes or a whole afternoon, whether your kids are toddlers or tweens, there’s something here that’ll work for your family.
Here’s your quick reference:
- Ghost Meringue Cookies, Simple baked treats perfect for beginners
- Boo-nana Ghost Pops, Frozen banana ghosts dipped in white chocolate
- Ghost Sugar Cookies, Classic decorated cookies
- Ghostly Cake Pops, Candy-coated cake on a stick
- Ghost Rice Krispie Treats, No-bake shaped treats
- Floating Ghost Donuts, Decorated store-bought donuts
- Ghost Marshmallow Pops, Quick decorated marshmallows
- Spooky Ghost Cupcakes, Topped with ghost designs
- Tissue Paper Hanging Ghosts, Easy hanging decorations
- Mason Jar Ghost Luminaries, Glowing painted jars
- Paper Plate Ghost Garland, Strung paper plate faces
- Cheesecloth Floating Ghosts, Stiffened fabric figures
- Handprint Ghost Wall Art, Kids’ handprints as ghosts
- Milk Jug Ghost Family, Recycled lit-up ghosts
- Cotton Ball Ghost Ornaments, Textured cardstock decorations
Mix the edible with the crafts, pair an easy project with a more involved one, or tackle them all over the month of October. These complement any vintage Halloween decorations you’ve collected and add that personal, handmade touch that makes your home uniquely yours. Pick what sounds fun to you and your kids, and don’t worry about doing every single one.
There’s something magical about watching your kids proudly display the ghost decorations they helped create, whether those ghosts are hanging from the ceiling or sitting on a plate waiting to be devoured. These 15 projects aren’t about achieving Pinterest perfection. They’re about flour on noses, giggles over wonky ghost faces, and the stories you’ll tell for years about the time your youngest ate all the chocolate chips before you could make eyes.
I’d love to hear how your ghost-making adventures turn out! Drop a comment below sharing which projects your family tried, any creative twists you added, or even your delightful disasters. Our community thrives on real experiences, and your story might be exactly what another mom needs to hear to take the plunge.
What age can kids start helping with these projects?
Most of these activities work for ages 3 and up with appropriate supervision, though toddlers can participate in simpler tasks like sticking on cotton balls or decorating with edible markers. Older kids can handle more complex projects like cheesecloth ghosts or meringue cookies independently.
How far in advance can I make these decorations?
Craft decorations can be made weeks ahead and stored in a dry place. Edible decorations vary, cookies and Rice Krispie treats keep for about a week in airtight containers, while fresh items like banana pops are best made 1-2 days before serving.
What if our projects don’t turn out perfect?
Crooked eyes and lopsided shapes make the best stories and the most cherished memories. Your kids won’t remember perfection, but they’ll remember laughing with you in the kitchen or proudly showing off what they made.
Remember, every wobbly ghost face and every slightly messy craft session is building something far more important than decorations. You’re creating traditions, confidence, and connections that will last long after Halloween ends. So grab those supplies, embrace the chaos, and make some ghosts together.

Average Rating